
Welcome to WordPress.com. This is your first post. Edit or delete it and start blogging!
Roast Chicken, Cranberry and Honey Mustard Pita Sandwich
•November 9, 2009 • 8 Comments I love roasting a whole chicken and then using leftovers in a variety of ways. My favorite as of late is this pita sandwich with roast chicken, homemade cranberry sauce, sweet and tangy honey mustard and fresh watercress. It’s a satisfying little sandwich and it’s pretty healthy. I used Greek pita bread that I placed under the broiler for a couple of minutes to get some color but you can obviously use any bread you wish. Layer some roast chicken breast over one half of the pita and top with honey mustard, cranberry sauce and a handful of watercress. Top with the remaining pita half and enjoy!
 Now don’t be fooled by the roast chicken being listed here first: the star of this sandwich is the fresh cranberry sauce. Sweet and tart with a hint of ginger, the cranberries take this sandwich to a whole new level. And considering shelves are stocked with tons of fresh cranberries, sauces and chutneys such as this will be creeping into our dishes pretty regularly over the next month or so.
Below, I’ll just share my recipe for a simple cranberry sauce but in the coming weeks will also write up the recipe for my favorite cranberry chutney … so stay tuned!

Cranberry Sauce
1 cup water
1 cup sugar
12-oz fresh cranberries (3 cups)
1/2 teaspoon freshly grated orange zest
Juice of small orange
Splash of Mavrodaphne (or Port)
Pinch of grated ginger
As I was already using my oven to roast the chicken, I simply combined all the ingredients in a baking dish, covered with foil and baked it until reduced to a thick, chunky sauce. Alternatively, just combine all the ingredients in a saucepan and simmer until the cranberries are soft and the sauce is thick.
Olive Oil Poached Cod, Mashed Sweet Potatoes and Sauteed Broccoli Rabe with Pine Nuts
•November 2, 2009 • 9 Comments We eat fish quite a bit: I pan fry whole porgies or cook them in a foil “pouch” with oregano, garlic and olive oil on a weekly basis. But more supple fillets of fish inherently prone to overcooking, usually pose a problem as they demand a bit more attention than I can offer on a weeknight.
It was only just recently I figured out a solution to this problem; it was only just recently I figured out that poaching fish in olive oil is an unbelievably forgiving method of cooking delicate fish that yields such amazingly tender, moist results. I cannot sing this method’s praises enough: it’s so simple and so easy, more importantly poaching really lets the fish shine and using good olive oil means it’s healthy.
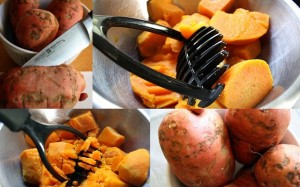
In this dish, I used some fresh cod, which is thick and meaty, but I’m certain halibut would work just as well here. I served the olive oil poached cod over mashed sweet potatoes flavored with grated ginger and a touch of cream as well as some sauteed broccoli rabe with pine nuts toasted with a dash of cayenne pepper. The kids gobbled it all up and even asked for seconds. Need I say more?


Olive Oil Poached Cod, Mashed Sweet Potatoes and Sauteed Broccoli Rabe with Pine Nuts
1 to 1 1/2 lbs. fresh cod
2 large sweet potatoes
Ground ginger, to taste
Dash of ground nutmeg
Tablespooon of butter or a splash of heavy cream
1 bunch broccoli rabe, bottom 2 inches of stems removed
2 cloves garlic, minced
1/3 cup pine nuts
Dash of cayenne pepper
Olive oil
Salt and pepper, to taste
To start with, clean and peel the potatoes and cook them in boiling water until fork tender (alternatively, clean the potatoes but don’t peel; wrap them in foil and roast until tender; cool and then peel). Mash them either with a potato masher or in a food processor, then stir in the ground ginger, ground nutmeg, butter or heavy cream, salt and pepper to taste. Set aside and rewarm when ready to serve.
For the broccoli rabe, rinse the stems and remove any thick or damaged leaves. Bring a pot of water to boil and add the broccoli rabe for just a couple of minutes. Remove the broccoli rabe to a colander and drain well. Meanwhile, heat a large skillet over medium high heat and add the pine nuts and a dash of cayenne. Shake the skillet frequently until the pine nuts are toasted and golden. Remove the pine nuts from the skillet and set aside. Add a couple of tablespoons olive oil to the skillet along with the minced garlic and cook until fragrant. Toss in the broccoli rabe and the pine nuts and combine well with the olive oil until heated through. Remove skillet from heat and set aside.
For the cod, heat some olive oil (enough to just cover the cod) in a dutch oven or deep skillet over very low heat. Cut the cod into individual portions, season with salt and pepper and carefully add it to the oil. Let the cod poach in the olive oil (keep the heat at low) until opaque and just cooked through, about 12 to 15 minutes depending on the size of the fillets.
Place the mashed sweet potatoes and broccoli rabe on the plate and carefully remove cod with a spatula and place over the potatoes to serve.
Try adding some fresh herbs or sliced garlic to the poaching oil so as to infuse the fish with those flavors as well.
Spanako-Quesadillas (Spinach Pie Quesadillas)
•October 27, 2009 • 21 Comments There are times when a quick lunch or dinner is a must but that doesn’t necessarily mean takeout or fast food needs to creep into our diet. The other night, I was all tapped out and as the kids had enjoyed a heavier lunch I wanted to make a rather light and quick dinner. Knowing that I had some spinach and some flour tortillas on hand, I thought, “Why not make some spinach quesadillas?”
I wasn’t originally thinking I’d go with a Greek flavor profile, but the container of Feta was calling out to me much more emphatically than the block of cheddar and so my quesadillas quickly became an easy (you might call it lazy) though extremely tasty version of Spanakopita (traditional Greek spinach pie).
I quickly sauteed some chopped onions, scallions, garlic and spinach then tossed in some chopped parsley and fresh mint that’s still growing in the garden. An egg, some crumbled Feta, a skillet, some flour tortillas … and voila, Spanako–Quesadillas.
Make these as a light lunch or dinner; accompanied by a salad it’s really all you’ll need. Better yet, serve these as appetizers or quick finger foods when you’re getting ready for a casual get-together with friends. Trust me, you won’t be disappointed.


Spanako–Quesadillas (Spinach Pie Quesadillas)
(Makes about 5 or 6 quesadillas)
Olive oil
3 scallions, sliced
1 small onion, finely chopped
1 clove garlic, minced
Pinch of ground nutmeg
4 cups fresh spinach or 1 small box frozen spinach
Small handful of parsley, finely chopped
A few mint leaves, finely chopped
Salt and freshly ground pepper, to taste
1 egg
Feta (add as much crumbled Feta as you like)
5 or 6 small to medium flour tortillas
Heat a couple tablespoons of olive oil in a skillet and saute the onion, scallions and garlic until softened, about five minutes. Add the spinach and cook until wilted and heated through, about five minutes more. Stir in the nutmeg, salt, pepper, parsley and mint. Place mixture in bowl and let cool slightly. Stir in egg and feta and adjust seasonings if necessary.
Meanwhile, wipe out the skillet and heat a tablespoon of olive oil over medium heat. Place one tortilla in the skillet and heat slightly. Add a few spoonfuls of the spinach mixture over HALF of the tortilla, then fold the empty half over the mixture and press down lightly. Cover the skillet and let cook for about five minutes; then uncover and turn your quesadilla carefully over. Cook a few minutes more. (Repeat with remaining tortillas and spinach mixture.)
Remove the quesadilla from the skillet, cut it in half or in thirds and serve warm.
Cranberry Mavrodaphne Clafoutis
•October 21, 2009 • 15 Comments I’ve always wanted to make clafoutis but for some very, very odd reason haven’t. I’m not sure why … these little desserts are really quite simple and so versatile. A complement to any and all seasonal fruit, they are the perfect ending to a savory dinner or a sweet and simple addition to a friendly brunch.


Cranberries, fresh or dried, embody (at least for me) the spirit of fall. They’re tart flavor and deep red hue just scream autumn. Simmered in wine and scented with cinnamon, they made the perfect base for these buttery clafoutis.
The Greek dessert wine Mavrodaphne is similar to port but sweeter and beautifully balanced the tartness of the cranberries here. Using the dried fruit made these clafoutis even simpler and though I loved every part of the dessert, I am looking forward to making clafoutis using fresh cranberries as well.


Cranberry Mavrodaphne Clafoutis
(Adapted from a recipe on Epicurious.com)
1 cup dried cranberries
1 cup Mavrodaphne
1/2 cup water
2 cinnamon sticks
3 large eggs
1 cup whole milk
3/4 stick unsalted butter, melted
1/4 cup sugar
1/3 cup flour
1 tsp vanilla
1/4 teaspoon salt
1 tsp sugar mixed with 1/8 tsp cinnamon
Preheat oven to 400 degrees with rack placed in center of oven. Butter either one 8- to 9-inch baking dish or 6 to 8 ramekins.
In a small saucepan, simmer the cranberries, Mavrodaphne, water and cinnamon sticks uncovered until it’s of a syrupy consistency. Pour the simmered fruit into the baking dish or ramekins and set aside.
In a large bowl, whisk together the eggs, milk, butter, sugar, flour, vanilla and salt until smooth and pour into the dish or ramekins. Sprinkle the cinnamon sugar over top and bake until puffed and set in center, about 35 to 40 minutes. Cool the clafoutis briefly and serve.

Butternut Squash and Caramelized Onions over Polenta
•October 19, 2009 • 10 Comments
It’s been a while since I participated in the Leftover Queen’s Royal Foodie Joust, but I’m back this month with an entry using each of the three chosen ingredients (orange colored squash/pumpkin; black tinted stout; sugar) and lots of Fall flair.
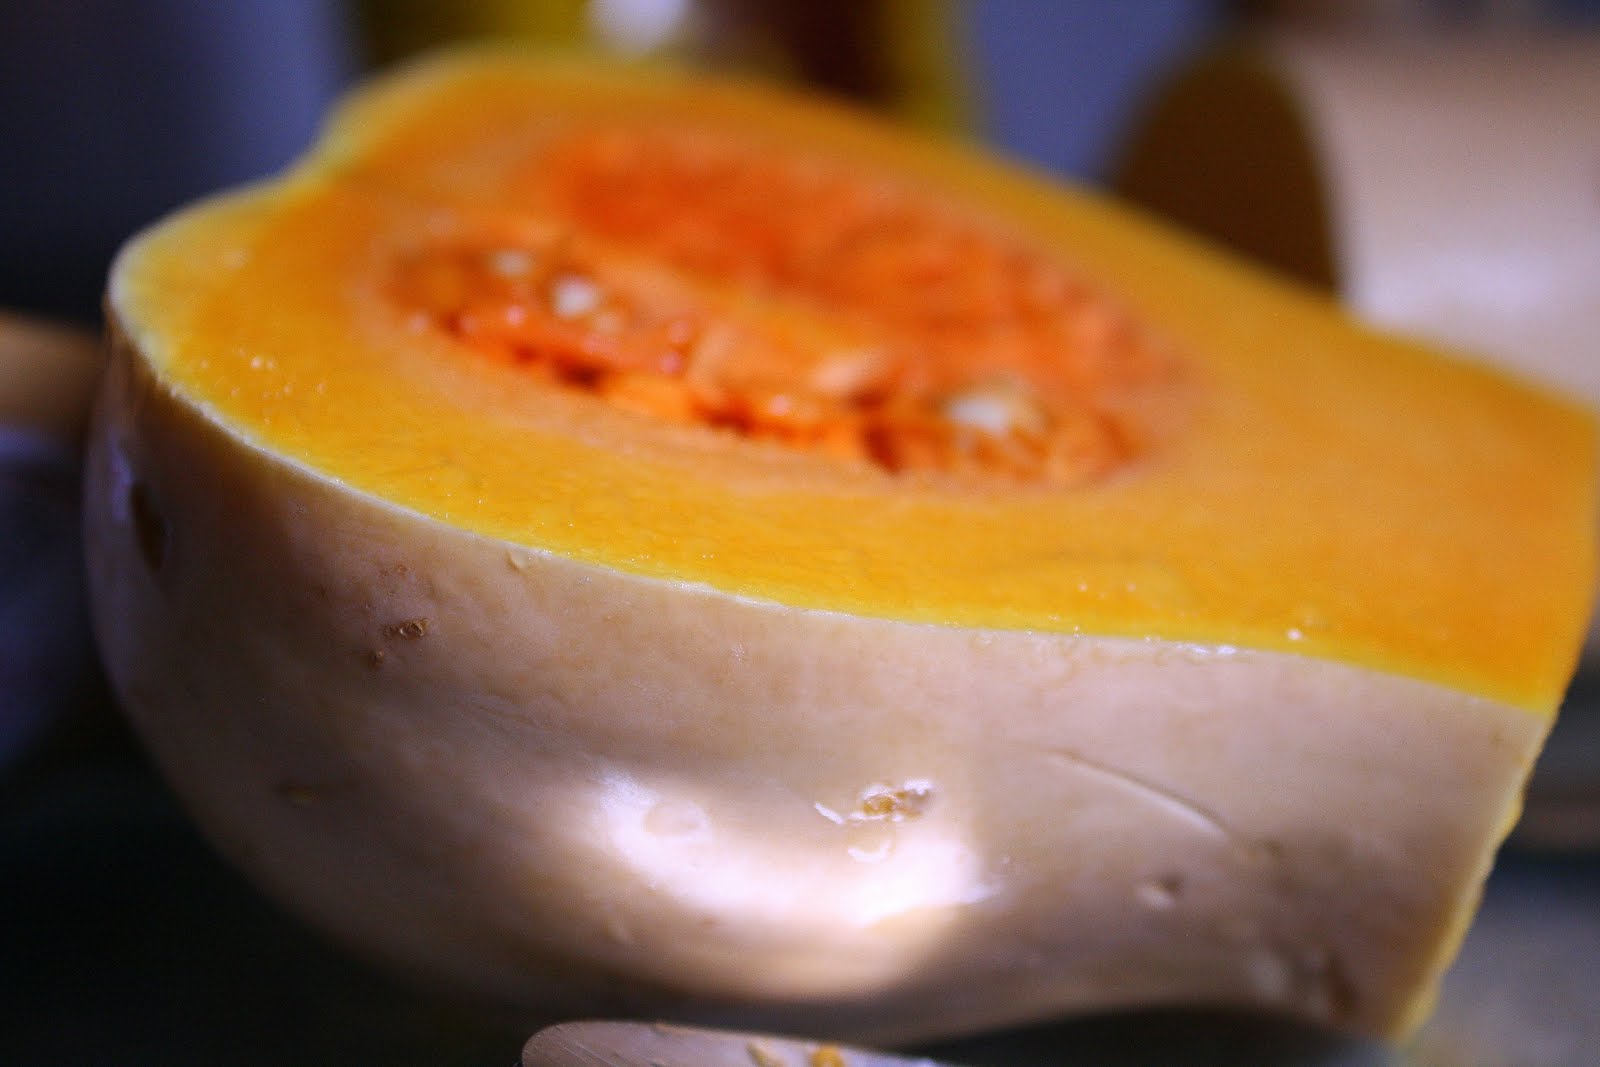
A heartwarming, soul-satisfying dish fit for Autumn is what I was going for here. So I took some flavorful butternut squash, soaked it in dark beer, coated it in brown sugar then browned it in some butter and roasted it with a bit of the beer til tender. Onions caramelized with the remaining beer joined the butternut squash atop a silky polenta.


Serve this as a side dish to grilled or roasted beef, veal or chicken; as a stand alone first course; or even a light main dish. I thought of adding some crispy bacon or pancetta but we’d had enough meat in our diet last week though either would add a great dimension of flavor to this dish though.
Now, if you’re a food blogger and not yet a member of the Leftover Queen’s Foodie Blogroll, head on over to Jenn’s site and sign up now. You’ll be part of a great community of bloggers, you’ll enjoy some great contests and giveaways and you’ll qualify to compete in the monthly Royal Foodie Joust.

Roasted Butternut Squash and Caramelized Onions over Polenta
1 small butternut squash, peeled and cut into large chunks
1/2 bottle dark beer
Pinch of cayenne pepper
1/2 cup brown sugar
2 to 3 tablespoons butter
2 medium onions, thinly sliced
Salt and freshly ground pepper, to taste
For the Polenta:
2 cups chicken or vegetable stock
2 cups water
1/4 teaspoon salt
1 cup cornmeal for polenta
1/4 teaspoon salt
1 cup cornmeal for polenta
Dash of nutmeg
Pat of butter
1/4 cup grated parmesan
Heat oven to 350 degrees. Place the butternut squash in a large bowl; add the beer and cayenne pepper and give it a good stir until all the pieces of squash are coated well. Let the butternut squash soak in the beer mixture for about 15 minutes.
As the polenta cooks, heat 2 tablespoons butter in a large oven-proof skillet. Place the brown sugar in a bowl and once the butter is heated well, take the butternut squash cubes straight from the beer, coat each piece well with brown sugar and add to the hot skillet. Brown all the butternut squash pieces evenly on all sides then add half the beer marinade to the skillet and place it in the oven to roast the squash until tender.
Meanwhile, begin the polenta by bringing the water, stock and salt to boil in a large saucepan. Gradually whisk in the cornmeal and cook the polenta over moderately low heat (at barely a boil), stirring quite frequently until thick and smooth, about 30 to 40 minutes. Remove saucepan from heat and stir in the nutmeg, parmesan and butter. (Polenta will keep warm, covered, about 20 minutes. Stir well before serving.)
As the polenta cooks, in a skillet or saucepan, add the remaining 1 tablespoon butter and the sliced onions and cook 4 to 5 minutes until softened. Stir in the remaining beer and continue cooking the onions until golden and caramelized.
Spoon some polenta on the plate–or in a bowl–top with some caramelized onions and place a few pieces of butternut squash on top as well. Drizzle with any sauce from the roasted squash skillet and serve immediately.
Ricotta Pancakes with Fig Compote
•October 13, 2009 • 14 Comments This weekend we picked the last of the figs off of our fig trees and it’s safe to say we’re all “figged” out. Since early September we’ve been blessed with literally hundreds of sweet purple-fleshed figs and I’ve made everything from a Greek fig spoon sweet; to roasted figs stuffed with Gorgonzola and wrapped in prosciutto; to a cinnamon-spiced fig jam; to two large batches of vanilla-scented fig compote. Not to mention that we ate dozens of these little fruits as is.
On Sunday morning, I opened my fridge to see a half full (some might say half empty) container of ricotta on one shelf and a jar of fig compote on another. The kiddies asked for a batch of pancakes so it was only natural I whip up some ricotta pancakes and serve them with a spoonful of fig compote, right?
 I’ve seen some ricotta pancake recipes call for separating the eggs, adding yolks to the initial batter, then whipping the egg whites to stiff peaks and folding those in as well. I have to admit, I think those steps are kind of unnecessary. Not that I’ve done any experiments to officially note any differences between either method, but I’ve always been left satisfied with the fluffy, light pancakes my simple whisking of all ingredients has yielded.
So here’s my recipe for ricotta pancakes. I flavored this batch with a splash of my aunt’s homemade vanilla but feel free to add either orange or lemon zest to perk these pancakes up as well.
 Ricotta Pancakes with Fig Compote
Makes about 8 pancakes
1 cup flour
2 teaspoons baking powder
1/4 teaspoon salt
1 tablespoon sugar
2 eggs
1/2 teaspoon vanilla extract
1/2 cup milk
1 cup ricotta
Butter (for coating griddle)
Fig compote (recipe below)
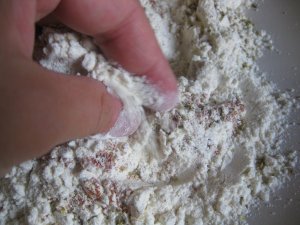
In a large bowl whisk the flour, baking powder and salt until well combined. Add the sugar, eggs, vanilla, milk and ricotta and whisk briefly (batter should be lumpy so don’t over stir). Note: If the batter seems much too thick add a splash of milk to thin it out.
Heat a griddle or skillet over medium-high heat and once hot coat with a little butter. Drop batter by 1/4 cupfuls onto the hot griddle and cook until small holes begin to form on top. Using a spatula, flip the pancake and cook just a couple minutes more until golden. Note: To keep other pancakes warm while making the rest, place on a baking sheet, cover with foil and heat in a 175-degree oven.
Serve pancakes with a spoonful of compote and a drizzle of maple syrup.
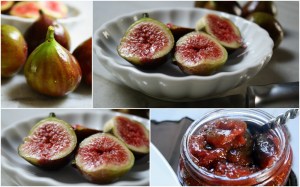
Fresh Fig Compote
Clean and dry about three cups of fresh small- to medium-size figs. Peel the figs carefully. Slice the figs in half and add to a saucepan along with 1/2 cup sugar and 2 cups water. Cook until the figs are really tender and reduced to a jam-like consistency. If needed, add a bit more water to continue cooking figs until tender.
Once done, remove pan from heat and stir in a teaspoon of vanilla extract. Let compote cool then spoon into sterilised jars; cover tightly and store in the refrigerator. Serve over pancakes, ice cream, yogurt or mascarpone cheese.
Greece
•September 8, 2009 • 15 CommentsIt’s hard to believe that our summer trip to Greece already came and went. Nearly six weeks of sea, sand and sun has made it a little difficult to get back into the swing of everyday life. But I’m looking forward to cooking up a storm this fall and winter; ramping up this blog with some great recipes; updating the look and feel of Kali Orexi; and exploring some culinary hotspots close to home.
Yet, before I begin any of that I’d like to share some shots from our trip … My plan this summer was to approach this year’s vacation through the eyes of a foodie, to go beyond the “touristy” tavernas and explore what culinary treats Greece really has to offer. But with two little ones in tow, their needs take centerstage and hopes of great culinary finds promptly give way to the kids simply enjoying every day of our family vacation more than anyone else. Regardless, we had an amazing time and here are some shots I think capture the essence of our trip well:
The Bridge at Rio Antirrio …

Fruit stand on the road towards Agrinio …
 Sunset from Kastraki, Agrinio …

 Sunset at Peroulades, Kerkyra …
 Traditional Corfiot architecture …


 The Museum of Asian Art in the Palace of Sts. Michael and George, Kerkyra …


 View of Faliraki, Kerkyra from the Palace grounds …
 Our favorite Olive Wood Workshop in Corfu’s Old Town…

In the Monastery of Paleokastritsa, Kerkyra …


And in the Monastery of Agia Paraskevi, Kynopiastes, Kerkyra …


 On Kerkyra’s West Coast …


 Tradtional Corfiot dance group performing in Liston, Kerkyra …


 On Kerkyra’s West Coast …


 Tradtional Corfiot dance group performing in Liston, Kerkyra …

Delectable late night fare: Greek gyro, tzatziki, fresh-cut fries and souvlakia …


 The popular Liston, Kerkyra …
 Heroes of the Cyprian Battle Square, Kerkyra …

 The bell tower of St. Spyridon …
 Traditional Corfiot specialty shops …


 One more view of Liston …
 Sunset over Erikoussa (from Peroulades), Kerkyra …


 The popular Liston, Kerkyra …
 Heroes of the Cyprian Battle Square, Kerkyra …
 Outside the church of St. Spyridon …

 The bell tower of St. Spyridon …
 Traditional Corfiot specialty shops …


 One more view of Liston …
 Sunset over Erikoussa (from Peroulades), Kerkyra …

Pikantiko Kotopoulo me Fassolakia–Spiced Chicken with Green Beans
•July 13, 2009 • 16 Comments

I love making tomato-based dishes, known as kokkinista (literally meaning “reddened”) and yiahni in Greek. Obviously versatile dishes, they can be made with a variety of seasonal ingredients; with any meat or vegetable available; and can easily be taken from basic to exceptional with a few herbs and spices.
In summer months, kotopoulo (chicken) kokkinisto makes for a much lighter dish than beef or lamb cooked in tomato. And more often than not, a main dish of just vegetables cooked this way graces our dinner table when the warm summer weather calls for lighter fare.
Here I combined some chicken thighs (a flavorful and, more importantly, cost-effective option) with some fresh green beans and added some Hungarian paprika and cayenne pepper for a little heat.

Pikantiko Kotopoulo me Fassolakia–Spiced Chicken with Green Beans
1/4 cup olive oil
8 chicken thighs, skin removed
1 1/2 lbs. green beans, rinsed and trimmed
1 large onion, thinly sliced
1 garlic clove, minced
1 cup chopped tomatoes
1/2 teaspoon paprika
1/4 teaspoon Hungarian paprika
Pinch of cayenne pepper
Salt and freshly ground pepper, to taste
Handful of dill, finely chopped
Handful of parsley, finely chopped
Heat olive oil in a large pot over medium high heat. Season chicken with some salt and pepper and add to the pot. Brown well on both sides then throw in the onion and garlic. Shake the pot to combine, then add the plain paprika, Hungarian paprika and cayenne pepper. Add the tomatoes to the pot along with some salt and pepper; bring to a boil, cover then lower heat to a simmer and cook chicken about 25 minutes or so. (Add some water or a bit of chicken or vegetable stock to the pot if necessary.)
Add the green beans to the pot, shake the pot and stir green beans lightly to coat with sauce. Cover the pot and cook until the green beans are tender, about 15 minutes. Sprinkle with the dill and parsley, adjust seasonings and serve with plenty of bread.
Bakaliarakia Tiganita kai Skordalia me Kappari–Fried Whiting with a Caper Skordalia
•July 8, 2009 • 15 Comments I’m lucky to have children who love to eat fish. Even luckier, I believe, that fish in New York is pretty inexpensive and pretty fresh. Family favorites such as Red Snapper (Synagrida) run between $6.99 and $7.99 a pound while Porgies (Tsipoures) and Sardines (Sardela) can be found for $2.99 a pound.
I went to the fish market yesterday intent on buying Barbounia (Red Mullet, which were $6.99 a pound) as we hadn’t had these tasty little fish in a long while. But when I got to the store, I quickly snapped up the smaller Bakaliarakia (Whitings) that I know the kids really enjoy. And at just $2.99 a pound, these tasty little fish were definitely a steal.


Almost all Greek tavernas around New York–and there are A LOT of them–feature fried bakaliarakia (whiting) on their menus. They serve these small but meaty fish with some garlicky skordalia and the dish is a favorite among most patrons.
As such, it was only natural that I fry our bakaliarakia yesterday and serve them with some skordalia. It’s an easy enough dish without much hullabaloo but there are a few cooking points I’d like to note:
- I find that when frying my fish, double-dipping it (i.e. in egg, then flour, then egg again and finally flour again) creates a much nicer crust.
- Season your flour well with your choice of seasonings but also season your fish with salt and pepper before dipping.
- When frying anything, heat your oil really well–you will never get a crisp, well-browned crust if your oil is not hot enough the second your fish touches it.
- As your fish finishes cooking, place it on paper towels to drain to keep the crust from getting soggy.


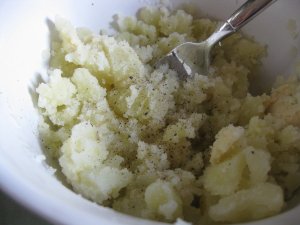
I served our bakaliarakia with some skordalia (garlicky mashed potato/bread) that I updated a bit by adding some chopped capers to. The tangy capers provided a great dimension of flavor and went well with the fish.
Note: I like to make my skordalia by simply mashing the ingredients with a fork as opposed to blending everything in a food processor–I just like the chunky texture as opposed to the smooth, sometimes elastic texture this dip gets when blended by the processor.


Bakaliarakia Tiganita–Fried Whiting
2 1/2 pounds small Whiting, cleaned
1 cup flour
1/2 teaspoon dried Greek oregano
1/2 teaspoon paprika
Salt and freshly ground pepper
2 eggs, beaten
Oil for frying
Wash the fish well with water; pat dry and season with some salt and pepper. Heat about an inch of oil in a large skillet over medium-high heat.
Combine flour, oregano, paprika, salt and pepper on a large plate. Place the eggs in another plate. Begin dipping the fish in egg, then dredge it in the flour (making sure to shake off the excess), dip it again into the egg then give it one final dredging in the flour. Place it directly into the hot oil and fry just a few minutes on each side until well browned. Remove fish to a dish lined with paper towels and serve warm along with some skordalia, a salad and some crusty bread.
Skordalia me Kappari–Caper Skordalia
2 medium potatoes, washed, peeled and boiled until tender
2 slices of white bread, crusts removed
1 large clove of garlic, minced
Salt and freshly ground black pepper
1 teaspoon red wine vinegar
Olive oil (about 1/4 cup)
2 teaspoons finely chopped capers
Drain potatoes well and place them in a large bowl. Begin mashing the potatoes with a fork and then set aside until somewhat cooled.
wet the bread with some water or milk and squeeze out any excess. Add it to the potatoes along with the garlic, salt, pepper and vinegar and stir and mash the mixture with a fork until well combined. Begin adding some oil in a steady stream stirring constantly. Once you’ve added enough oil to reach your desired consistency, stir in the chopped capers.
Allow the skordalia to sit for a while, then serve with fried fish, fried eggplant/zucchini slices or some fresh bread.
